
For making the fondant figure you need the following:
- sugar paste and gum paste (the colors depends on your chosen cake design)
- non-stick modeling board
- small rolling pin
- modeling tools (very small, small and medium ball tool, cutter tool and sugarcraft knife, sword tool, veining tool)
- thick shaping foam
- food color pen (black and blue)
- color dust (red)
- other materials (a little shortening, edible glue, a brush, toothpicks, powdered sugar, a small piece of polystyrene)
Now, before starting the tutorial I'd like to mention that for the strong colors (black, red) we used a combination of sugar paste and gum paste (with the proportion of 1 to 1), if you want you can make the whole sugar figure using this type of paste, you just need to model a bit faster because it dries faster than the regular sugar paste.
Step 1. Making the shoes and legs
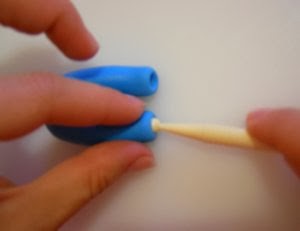
The first two elements you need to make are two identical small balls of sugar paste, shape them using your index finger (make a rotation and slightly pressing in the same time more closer to one end). You can define the heal and the sole using the cutter tool for a more realistic look, and insert a toothpick in each shoe like shown below.
- small rolling pin
- modeling tools (very small, small and medium ball tool, cutter tool and sugarcraft knife, sword tool, veining tool)
- thick shaping foam
- food color pen (black and blue)
- color dust (red)
- other materials (a little shortening, edible glue, a brush, toothpicks, powdered sugar, a small piece of polystyrene)
Now, before starting the tutorial I'd like to mention that for the strong colors (black, red) we used a combination of sugar paste and gum paste (with the proportion of 1 to 1), if you want you can make the whole sugar figure using this type of paste, you just need to model a bit faster because it dries faster than the regular sugar paste.
Step 1. Making the shoes and legs
The first two elements you need to make are two identical small balls of sugar paste, shape them using your index finger (make a rotation and slightly pressing in the same time more closer to one end). You can define the heal and the sole using the cutter tool for a more realistic look, and insert a toothpick in each shoe like shown below.


At this stage you should let them dry for at least 1/2 hour.
For legs and waist you can use an easy method that is faster and easier, from a piece of sugar paste make a shape like a cord but thicker in the middle and slightly thinner at the ends, then just bend it and the legs are already starting to look like some real legs. :)


With the veining tool you can define the strips between legs and with the very small ball tool make some small holes so that you'll be able to stick nicely the shoes.


Now, cut the excess of sugar paste with the sugarcraft knife and attach it to the shoes (of course only after you brushed the toothpicks of the shoes with glue)


And the boy's legs are done!
Let them dry for 5-8 hours (depends on the sugar paste you're using).
Step2. Making the body and the head
For modeling the body the below images are very relevant, just want to mention that the size of the sugar ball we started with was the proper one only after the 3rd try because at first it was not matching with the size of the legs.


Now, insert a toothpick in the body for sustaining the head later on.


Modeling of the head is very important because the expression of its face it's shaped at this stage, so you can make it serious and sober like we did or you can make it smiling or upset, also you can make a smaller head or a bigger one depending on your character or fellow that you want to make, so first play a little with the sugar paste and see which one is best for your design.
That small hole where the eyes come you can make using your index finger or your small finger (if it's a smaller head) using the same method as the one used for shoes, for the little nose and defining its lips just use the veining tool, for the opening oh the mouth first press gently with the sword tool and then if you need to increase the the opening just press gently in it's mouth with the flute tool. Handle it with care on the thick modeling foam so that it will maintain its original shape.
Then attach it to the body once you brushed the toothpick with a little glue .


If it tends to fall or incline to the front put something to sustain it for couple of hours (we used a piece of kitchen paper rol). At this stage let it dry for 12 to 24 hours.
Step3. Attaching the shirt and the arms
For shirt, roll on a thin sheet of sugar paste and cut out a rectangular shape after you measured the height needed for your figure which should be the width of your sugar paste sheet. Do some tries and see how it suits on it, then brush its body all over with glue and attach it in such a way that you cover the joint of the pants with the body.


The arms you can make them in this simple way we have chosen for this tutorial or you can make first its shoulders and add later the arms, so it's up to you which method you choose.


Now, add some more small simple details on the shirt to look make it look more realistic and elegant.


For the shirt's collar you cut a small sheet of paste with the width of 2 cm (may more maybe less, depends on your figure's neck) and wrap it in two and attach it on its neck.


Step 4. Adding the final details (tie, hair, hands, etc)
For hair start from a black (or other color) paste and just press it well with your palm till you get a shape like below, then see how it suits on its head and if necessary make another try starting from a different size of the paste ball.


You can make a tiny knot tie as well so that you masque the joint from the upper part of the tie with the shirt's collar and it gives a nice look under its chin.


At this stage you're almost done just add the hands, color its eyes and lips and that's it!


In the below images maybe it's not very easy to notice, we drew first the eyes with the blue pen and in the middle we drew the small eye's pupils with the black pen with thin tip


Let it dry for 2-3 hours and the little sugar fellow it's ready to go on top of the cake!
You should be proud of your creation as it's a bit of work after all..
You should be proud of your creation as it's a bit of work after all..
0 comments :
Post a Comment